A Simple and Fast Way To Organize a Side-by-Side Refrigerator in 9 Steps
If your refrigerator is anything like mine, it’s crammed full of food, drinks, and who knows what else. Every time I open the door, something falls out. Plus, because I can never find anything, food goes bad and needs to be thrown away weekly. When I clean it, I find multiple bottles of ketchup and almost empty pickles. Here are some tips on how to organize a side-by-side refrigerator.
Tip #1: Start With A Clean Slate
Before organizing your side-by-side fridge, you want to ensure that all its surfaces, bins, and shelves are clean. You can start by wiping all of these areas thoroughly with paper towels.
While cleaning your refrigerator and the back of the fridge, make sure you take inventory of all items within it and remove any food or ingredients that have expired. It would help if you also threw away anything you don’t need.
The first step to organizing your fridge is to empty it out completely. That means taking everything out, including all the food, drinks, condiments, and Tupperware. Once everything is out, give your fridge a good cleaning. Wash down the shelves and drawers with soapy water and dry them thoroughly. Don’t forget to vacuum the coils at the back of the fridge! They can get dusty over time and affect how well your fridge keeps things cool.
As you clean the interior compartments of your side-by-side refrigerator, you want to do the following:
Take out the different types of food within compartments — including the freezer — and place them in cool glass containers. Take out all of your removable drawers, along with the upper and lower shelves, and allow them to warm to room temperature before you start washing.
Wash your fridge’s removable parts and interior surfaces by hand. Use a soft sponge or cloth with warm water and clean all areas with a non-abrasive cleaner.
Be sure to dry all surfaces before reinstalling drawers and shelves. Once done, you can plug your fridge back.
Since refrigerators are so large, they’ll have different exterior textures. You’ll need to approach them differently in terms of cleaning. Just like French door refrigerators, you should also take time to clean the outer part of your side-by-side refrigerator.
It’s always best to read your fridge’s manual to learn how to care for it.

Tip #2: Create Zones
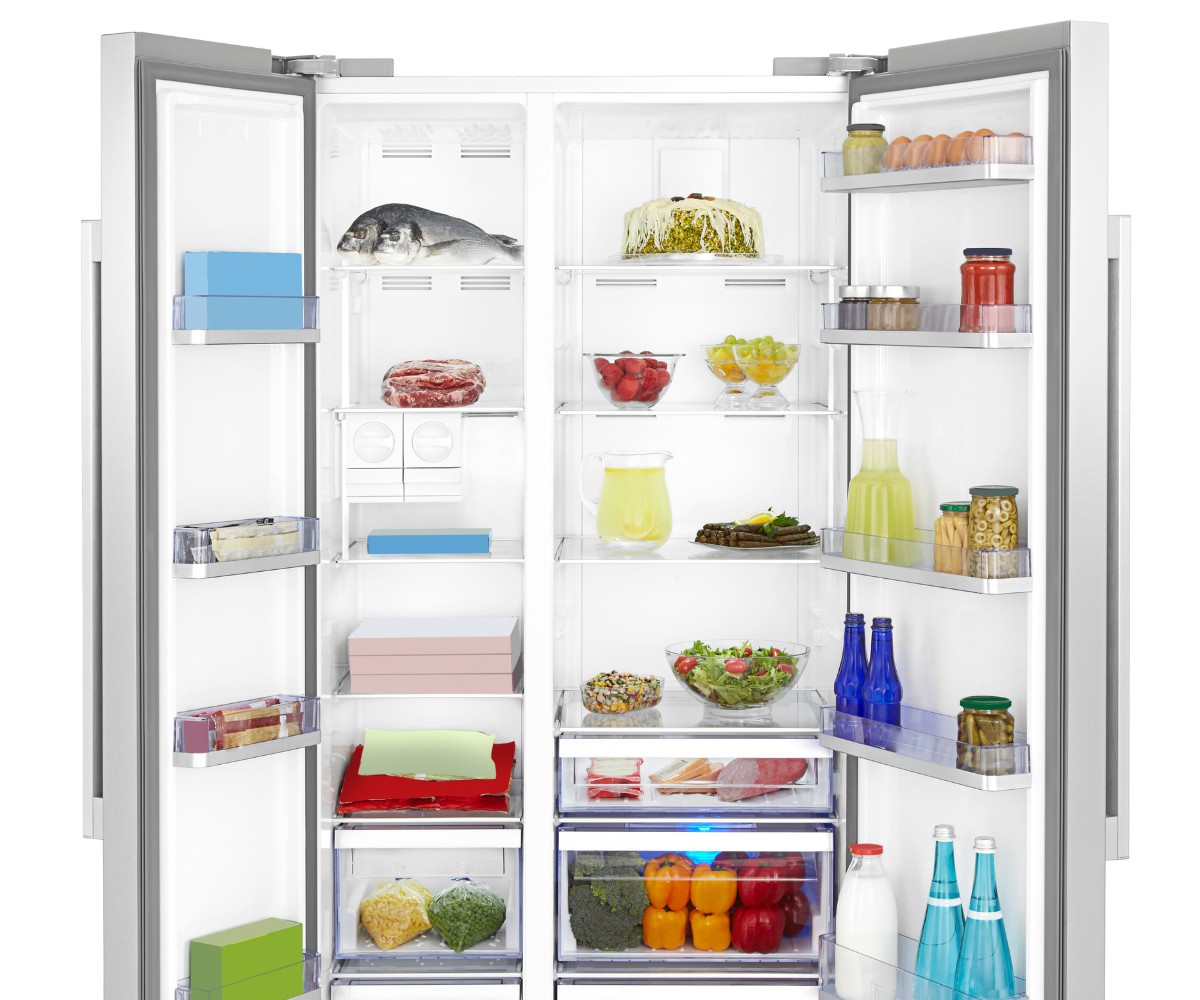
After you’ve given your fridge a good cleaning, it’s time to start putting things back in. But before you do, take a minute to think about what you use most often and where would be the best place to store those items. For example, milk and other dairy products should go in the door compartments because they don’t need to be as cold as other items in the fridge. Eggs can also go in the door compartments or in an egg holder on one of the shelves.
Condiments can go in the door compartments or on a shelf near the front of the fridge, so they’re easy to grab when you’re cooking. Fruits and vegetables can go in the crisper drawers or on shelves near the front, so you remember to eat them before they go bad. Meat and fish should be stored on shelves towards the back of the fridge where it’s coldest. And last but not least, leftovers can go on any shelf towards the front, so you don’t forget about them.
Shelves allow us to maximize our refrigerator. They are great for storing jars and containers. A great way to begin fridge organization is to group the same food items. That will make it less troublesome when you need to find specific things in your refrigerator.
As you organize your things, take note of the various temperatures affecting your fridge’s top, middle, and bottom shelves. Usually, the lower shelves will be much cooler than the top shelves.
The must-have items you want easy access to in the morning — like eggs and dairy products — are best placed on the upper shelves. Items stored in the upper compartment will increase shelf life. That’s why it’s best to keep fresh foods, water bottles, salad dressings, and leftovers here.
On the other hand, you should place perishable items such as raw meat and ice cream on the lowest shelf to avoid food waste.

Tip #3: Sort Your Fridge Drawers
Drawers in your side fridge provide a lot of space to store the smaller items and ingredients you buy from the grocery store. They provide the proper place and environment where sensitive products can stay until you use them — or until their expiration date. For instance, you can use the deli drawer of your refrigerator to store meats and cheeses, while fruits and veggies should go to your crisper drawers.
Using the crisper drawers of your fridge can change the humidity based on the type of vegetables or fruit you place there. Thin-skilled vegetables and fruits are ideal for storing in high-humidity crisper drawers. Their thick-skinned counterparts will benefit from a low-humidity drawer. It would be best to use bin liners to catch leaks or spills.
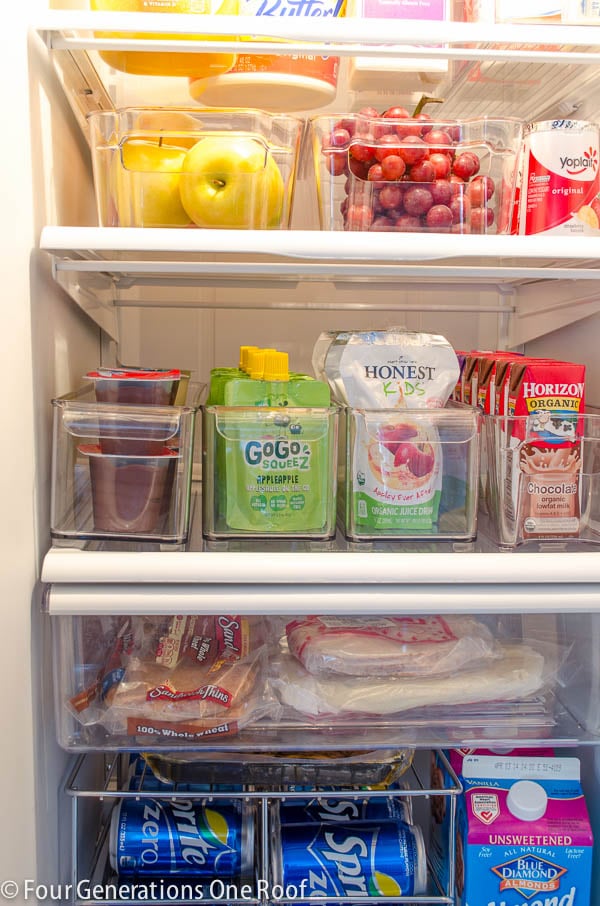
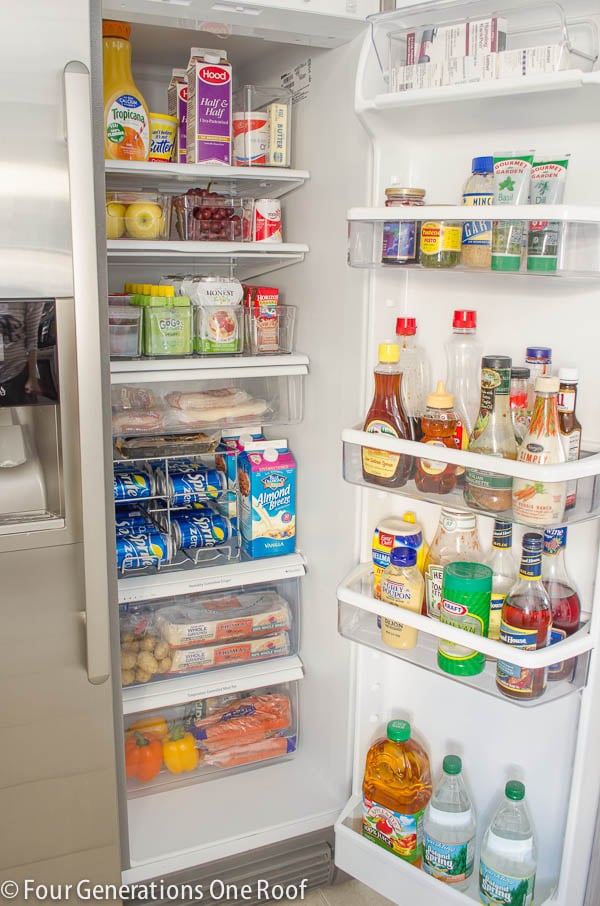
Tip #4: Use Storage Containers To Organize A Side By Side Refrigerator
Your stainless steel fridge’s drawers and stackable bins can be even more creative. The best practice is to designate compartments for the items you eat first or for snacks, so you and your family can keep track of expiration dates. Use a label maker to make it easy to identify areas. Once you’ve decided where everything will go, it’s time to start putting things away. But instead of just throwing everything in willy-nilly, take a few minutes to invest in some storage containers. Storage containers help keep things organized and easy to find. Plus, they help prevent spills from making a mess of your fridge. Most home goods stores carry storage containers specifically designed for fridges. Or you can use mason jars or other glass containers with tight-fitting lids. Make sure whatever you use is clean and dry before filling it up!
Using a variety of sizes, your clear bins will provide flexible storage areas for different items. That lets you spend less time finding the things you need.
Tip #5: Organize Your Freezer
The following plan is to organize your side-by-side freezer. That is particularly important since this location can quickly become overcrowded due to the ingredients you purchase regularly.
You can keep your freezer organized by putting some items on top of each other. One way you can do so is by using freezer-safe airtight containers and bins. Another method is to sort things based on their expiration date, so you can avoid food waste while spending less time finding what you need.
However, you don’t want to overfill your freezer with containers. Doing so can result in blocked vents that can hinder proper air circulation. Improper circulation can easily lead to cooling problems that can damage your fridge in the long run.

Tip #6: Transfer Less-perishable Things to the Fridge Door
Items that don’t perish right away can be placed in your fridge door since this area is the most subject to temperature fluctuation. This location can be like a small lazy Susan since you can put condiments like soy sauce and specialty items such as olives, capers, butter, and soda.
You’ll find that many refrigerators have door bins made for large containers, and it can be tempting to place milk and other beverages inside them. However, the best place to store milk is on the upper or middle shelf, where the temperature will stay consistent.
Avoid storing eggs in your refrigerator doors due to inconsistent temperatures. Instead, you should place them on an interior shelf that will be cooler.
Some great advice is to designate a specific side of your fridge door where you can easily access items to garnish recipes.
Tip #7: Use Hanging Storage Baskets To Organize A Side By Side Refrigerator
Just like the clear storage bins, small baskets that you can hang on the walls of your fridge can be a great way to organize and maximize space inside. These baskets can be especially beneficial when you have many small items to keep track.
Rather than having all of these things scattered throughout various shelves, you can take back control and find items you need immediately through basket organization. That can help you spend less time looking for what you need while letting you focus on the actual cooking.
Tip #8: Store Similar Items Together
Another essential tip to organize a side-by-side refrigerator is to store the same items together as much as possible. Keeping things in this manner will help you maintain control and enforce good order in your side-by-side refrigerator.
Those with limited freezer space will find it trickier to apply this method — especially when they need to add something. However, it’s essential to do your best and ensure that food items like meat and ice cream aren’t stored together.
When you have each type of food assigned to a specific area in your freezer, you’ll spend less time digging for something you need when it’s time to cook.

Tip #9: Set Up a Staging Area for Upcoming Meals
If you have an extra freezer, you can set up a staging area where you can find the main ingredients for upcoming meals. Designating a location like this will help you save precious time you could spend preparing your food.
Final Thoughts On How To Organize A Side By Side Refrigerator
For those without an additional freezer, you can still designate a specific shelf for meals you plan to do for the coming week. This location will make it easier for you to design and prepare meals moving forward.
A well-organized refrigerator can make your life easier and help your food last longer. Following these simple tips can turn that chaotic jumble of food into an organized oasis. You’re not alone if you have a side-by-side refrigerator but don’t know how to organize it. Many people feel overwhelmed when they first see this type of refrigerator. But with a little guidance, you can easily organize a side-by-side refrigerator and make the most of the space.
Follow our simple tips and tricks, and you’ll be able to find everything you need in no time. Plus, your fridge will look neat and tidy – which is always a bonus.